
Free DPI Converter
Easily change the DPI of your image to 300 DPI, 600 DPI, or any custom value in seconds with our online DPI Converter. Perfect for printing, web publishing, or document uploads. Your files stay fully private and never leave your device.
How it Works
Change DPI of Your Image with Our DPI Converter in 3 Simple Steps
Choose Your Image
Select an image from your device. We support common formats like JPEG, PNG and more.
Select DPI
Select a DPI value from pre-set options (72 DPI, 100 DPI, 150 DPI, 200 DPI, 300 DPI, 600 DPI), or enter a custom value.
Convert DPI & Download
Your image will be converted immediately and downloaded automatically after completion.
The Basics
What Is DPI, and Why Should You Care?
You’ve probably spotted DPI mentioned in an upload portal or on a print form, and getting to know it is easier than you’d think. DPI (Dots Per Inch) is the number of tiny ink dots your printer squeezes into every inch of a printed photo or document. It’s this DPI setting that decides how sharp your prints turn out, whether you’re printing at home or sending your photos to a print shop. Getting it right really pays off. Even your sharpest JPEG or PNG deserves the correct DPI value in its metadata so it truly shines in print.
For your image, that means higher DPI gives you more detail and a crisper look the moment you hold it in your hand. Use our smart DPI Converter tool to set the correct DPI value and get the perfect print quality, without touching your actual pixels.
Are you curious how much difference a DPI really makes? Drag the interactive DPI slider below and watch it happen.
Runs Completely in Your Browser
A DPI Converter That Works the Way You Do
Built for your privacy, speed, and precision – here’s what makes Oplyse different from the rest.
Free & No Signup
This online DPI converter is completely free, no signup needed, and no software installation required. There is no watermark, and no usage limit.
DPI Checker
View the current DPI value of your image, before changing it to a new value. The current DPI value is shown right after you choose your image.
Instant Download
Your image will be automatically download to your device, after successful conversion. No extra clicks.
Custom DPI Values
Choose from preset DPI values (72, 150, 300, 600, 1200) or enter a custom value.
Broad Format Support
This image DPI converter supports multiple image formats, for example JPG, PNG, BMP, WEBP, GIF, DCM, JPE, and more.
Cross Platform
Our DPI Converter is platform-independent. It works seamlessly on Windows, Mac, iOS and Android.
DPI Requirements, by Use Case
Find the Exact DPI Your Document Actually Needs
Government portals, print-on-demand platforms, and publishers each enforce their own DPI standard. Find your category below and see the number they require, directly from the original source. Then set it with our DPI Converter in a few seconds.
Government & Visa Applicants
Match the DPI value each portal expects using our DPI Converter, so there is no rejection and no re-uploading.
Passport Seva: If you are applying for a passport through Passport Seva, your photo needs to be at least 300 DPI (regardless of using NIC’s scanning software or not).
National Informatics Center (NIC): NIC specifies that your documents and photos should be set to 300 DPI. Incase you can’t use NIC’s scanning software, then set DPI to 400 instead.
Protean (NSDL): To get your PAN card, and pass through KYC process, Protean (formerly know as NSDL) requires your photo to be scanned at 200 DPI, and must be in JPEG(.jpg) formats.
NADRA and DG Immigration & Passports: If you are applying for CNIC/NICOP or passport, NADRA and DGIP require your documents to be scanned at 600 DPI. Only JPEG, JPG, and PNG formats are acceptable.
Print-on-Demand
Apply the right DPI across your whole catalog at once, because our DPI Converter supports batch processing.
Amazon KDP: If you are an author and aiming for Kindle Direct Publishing (KDP), both cover and inside images need to be of 300 DPI. The Ebook cover is required to be RGB, while the paperback/print version should be in CMYK and size at 100%.
Print-on-Demand (POD): Do you want to print an image of your loved one on a T-shirt, mug or anything else?. Most POD services require your image to be of 300 DPI. It is worth mentioning that your image will look sharp on the web (with 72 DPI), but will look pixelated when printed on a T-shirt, or mug.
Direct To Film (DTF) & Sublimation Printing: For your next DTF project, use 300 DPI, as it is the recommended industry standard. For sublimation onto hard or rigid surfaces, use 600 DPI instead.
Creative & Everyday Users
Photographers & Designers: Preserves your original pixel data while adjusting print resolution, since Oplyse does not resample. Use 300+ DPI as it is standard for sharp and sellable prints.
Students & Professionals: If you have scanned documents saved at the wrong DPI, just change the DPI with our free DPI converter, no need to rescan.
Factors that Affect DPI
How to Choose the Right DPI Before You Convert
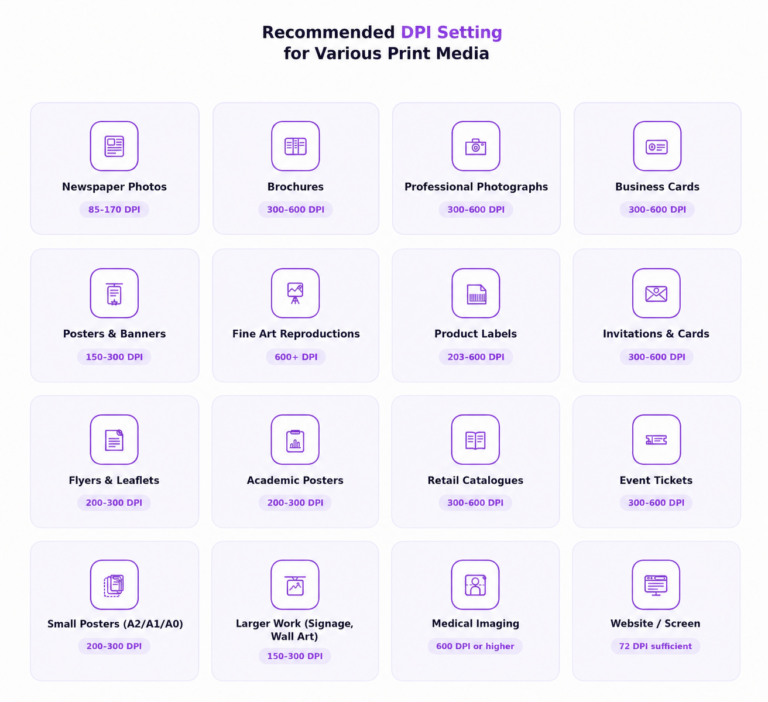
There’s no one-size-fits-all answer. The right DPI depends on your use case, what you’re printing and why. Viewing distance, print size, and the printing medium all play a part.
Commonly Confused Terms
DPI vs PPI: What’s Actually the Difference?
Many people use DPI interchangeably with PPI, as for most practical purposes, that works. However they’re not exactly the same. If you’re about to run am image through a DPI Converter, it is worth knowing which one you are actually changing. See the actual difference side by side in the following table.
|
Aspect |
DPI (Dots Per Inch) |
PPI (Pixels Per Inch) |
|---|---|---|
|
Definition |
DPI refers to the number of ink dots that makes up every inch of a printed image |
PPI refers to the number of pixels that make up every inch of a digital image |
|
Primary Use |
Measures print resolution |
Measures screen resolution |
|
Application |
Used in printing to ensure sharp and detailed print |
Used in digital displays to define pixel density and image clarity |
|
Impact on Clarity |
Higher DPI means more printed dots per inch, leading to sharper prints |
Higher PPI means more pixels per inch, resulting in sharper digital visuals |
|
Common Values |
300 DPI for high quality prints |
72 PPI (low resolution screens), 300+ PPI for high resolution displays (4K) |
|
Effect on File Size |
Higher DPI increases print file size but does not affect digital display size |
Higher PPI increases digital file size and memory usage in digital applications |
Metadata vs. Resampling
Does Changing DPI Actually Improve Quality?
No – not on its own. It is the single most misunderstood part of image resolution, and it’s worth being direct about it rather than vague. There are two completely different things an image DPI converter can do to your file, and which one you need depends on your situation.
Two ways to change it
Metadata-Only Change
This is actually what our DPI Converter does by default. It edits the file’s EXIF resolution tag without touching the actual pixels – the grid above stays exactly as it was. The tool only changes the instruction a printer reads to decide how large to print it.
It’s fast, lossless to the original pixel data, and exactly what’s needed when a form, portal, or print shop simply requires a specific DPI value in the file’s metadata – a passport photo upload, an exam form, a signature scan.
Resampling (Upscaling)
It recalculates and adds new pixels through interpolation to physically increase resolution – the dashed dots above are guesses, filled in between the real ones. It’s what’s needed if your image doesn’t have enough real pixel data to print sharply at a larger size.
Interpolation, the method behind most DPI conversion, can’t invent detail that was never captured. Pushed too far, it produces soft, blurry, or artificial-looking results. AI upscaling tools go further by guessing plausible detail, which can look convincing but isn’t real captured information.
The practical rule
If a portal or print shop just needs to see 300 DPI in the file, running it through our DPI Converter is enough. It preserves your original image exactly. If you’re trying to print an image physically larger without it looking soft, you need real resampling – and the ceiling on quality is set by your original pixel dimensions, not by that number.
Know before you print
Figure Out Exactly How Many Pixels Your Image Needs for Any Print Size
DPI requirements vary based on the intended size of the image. Below we explain how to calculate pixel density for a given physical size of the image at a particular DPI value. All calculation below are based on 300 print resolution. Use 600 or any other multiplier based on your print media.
Calculate DPI
pixels ÷ cm = DPI
Divide the length in pixels by the physical length in centimetres to get the DPI of any image.
At 300 DPI
inches × 300 = pixels
Multiply the physical size in inches by 300 to get the required pixel dimensions for print-quality output.
| Size | Calculation | Pixels at 300 DPI |
|---|---|---|
| 4″ × 6″ photo | 4×300 × 6×300 | 1200 × 1800 px |
| 5″ × 7″ photo | 5×300 × 7×300 | 1500 × 2100 px |
| A4 page | 8.27×300 × 11.69×300 | 2480 × 3507 px |
Source: adobe.com
Once you know the pixel dimensions you need, then you can use our DPI Converter to set that desired DPI value.
First Things First
How to Check DPI on Windows and Mac
Before you convert image with our DPI Converter, check first it’s current DPI. On Windows, use File Explorer, and on Mac, use the built-in Preview app.
- Open File Explorer, and navigate to your image
- Right click the image file and select Properties
- Click the Detail tab at the top bar
- Scroll down to find Image Dimensions and the DPI Resolution
- Open Finder, and navigate to your image
- Right click the image file and select Open With > Preview
- With Preview open, go to Tools > Show Inspector
- Select General info (first tab) to view dimension and resolution
- Click More Info (second tab) for full dpi detail
Did you Know?
See the DPI Your Phone, Mac, or Windows PC is Already Using
Every device has a built-in default DPI. You just never had a reason to check it. Here we cover the most common ones, and yours is likely among them.
| Setting | DPI |
|---|
Best Practices
Do’s and Don’ts for Perfect Prints
Before you run anything through a DPI Converter, keep these six things in mind, as they will save you from common mistakes that waste time and paper.
-
1
Confirm what’s actually being checked: First, check whether only the DPI number in the file’s metadata is required (government/exam portals, most print shops) or whether actual print sharpness at a larger size is needed (POD, framed prints), since the fix is different for each.
-
2
Back up the original: Always keep a copy of the original file before making any change, so you have something to fall back on if something goes wrong.
-
3
Check your pixel dimensions: Increasing DPI alone doesn’t fix a low-resolution image. Check your pixel dimensions against your intended print size and target DPI to be certain the image can actually support it.
-
4
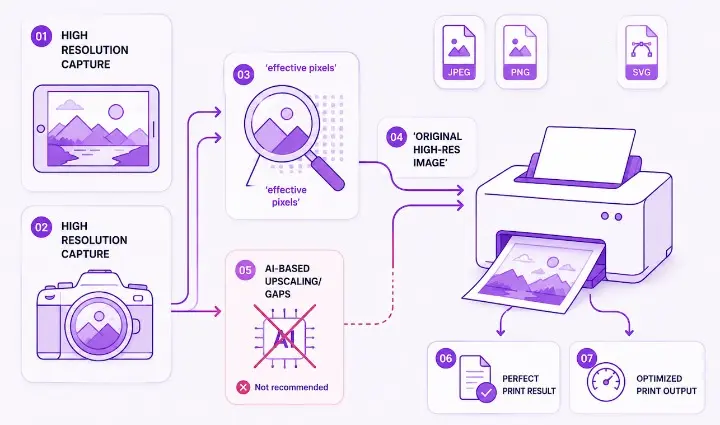
High quality source image: Capture with a high-resolution camera for the best printed output. A great print starts with a great source.
-
5
Image format: DPI only matters for raster images. If you’re working with JPG or PNG files, converting DPI makes sense, but vector graphics like SVG are resolution-independent and don’t need DPI conversion at all.
-
6
Test one file: Before a POD/KDP batch run, make a test print. It’ll help you catch quality or format issues before they multiply across dozens of products.
The History of DPI
How DPI Evolved Over Time
The evolution of DPI over time will help you understand where today’s DPI standards come from, and why you constantly see specific values like 300 DPI in modern requirements. The illustration below shows how printing and display technologies have evolved over time.
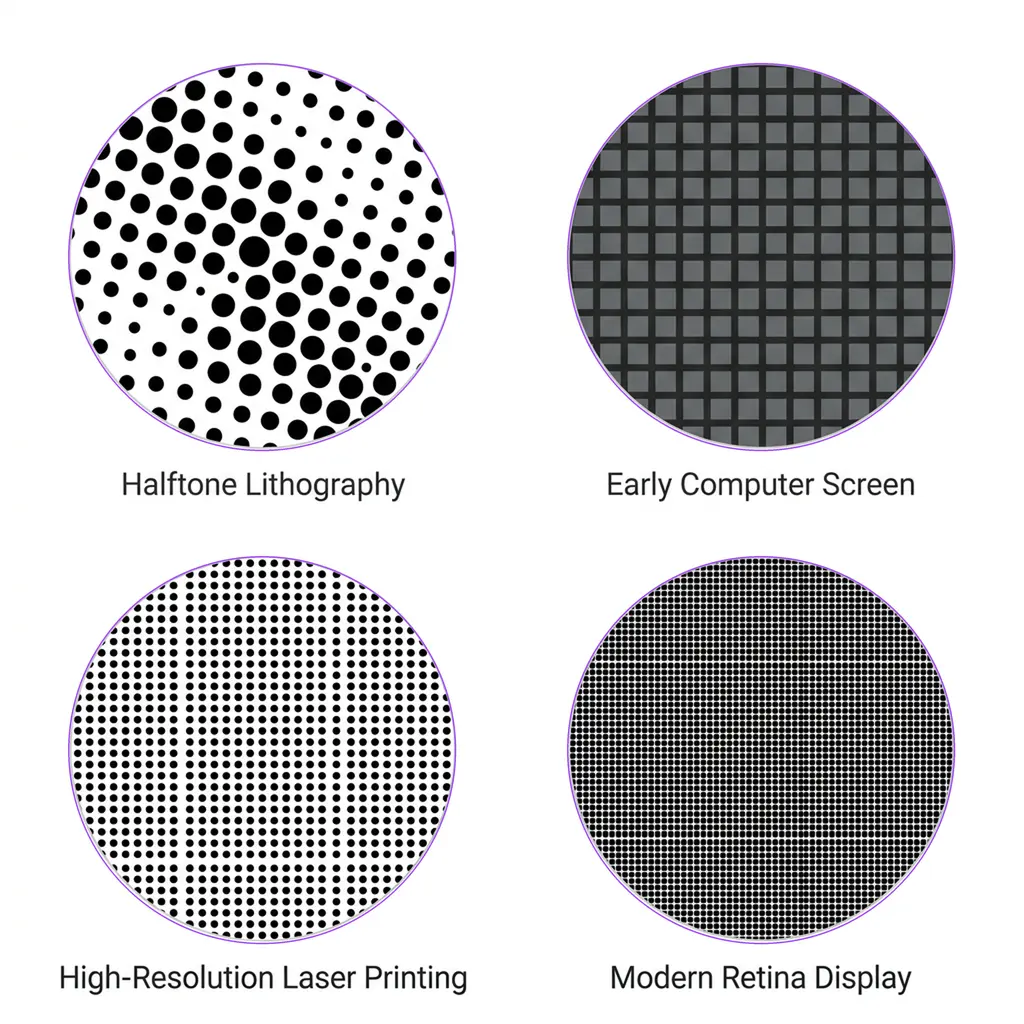
Long before digital cameras and inkjet printers existed, printers had to reproduce photographs using nothing but tiny ink dots. It was Halftone printing, and it worked by running a digital file through a Raster Image Processor, which turned the image into that dot pattern.
Screens in the 1970s and ’80s weren’t much better, with blocky, visible pixels. Laser printing then packed dots tighter, sharpening brochures and business documents without needing bigger paper. Today’s cameras, printers, scanners, smartphones, and retina displays have pushed that detail even further.
FAQ
Got Questions? We’ve Got Answers
Ready to change your image’s DPI?
Use this free online DPI converter by Oplyse